
Logistics TMS plugin
A Transportation Management System (TMS) helps logistics companies track shipments and other transaction records by providing information such as status, location, internal notes, and related documents.
The sample plugin described in this topic provides a TMS sample plugin that can be adapted to a customer's TMS of choice, or can be adapted for other use cases outside of logistics (at its core, this plugin essentially reads information from an external system of record, presents it to the user, and allows the user to take contextual Front actions such as replying to an email with prepopulated information, or updating internal notes in the external system). In either case, building from this plugin should save you time during development.
This sample plugin is applicable to many use cases such as customer service, finance, hospitality, retail, etc.
For the sake of demonstration, the plugin showcases logistics data, but the general framework applies to other industries. The plugin reads data from an external system in order to augment the information available to the Front user via the sidebar. The extra information allows users to answer customers more quickly and with higher quality responses. Additionally, users can draft replies with prepopulated information from the external system, create internal notes, search for additional records, and view positional or visual information that adds context-at-a-glance for the Front user.
Video Overview
Features
- Loads the Front Plugin SDK through React context
- Reads data from a RESTful API and displays it in the Front sidebar
- Implements the Front UI Kit to save time developing UI components
- Detects links attached to the selected Front conversation and loads record data related to those links
- Allows the user to search for a specific record by ID
- Lists documents attached to the record or conversation and allows users to attach those documents to the reply
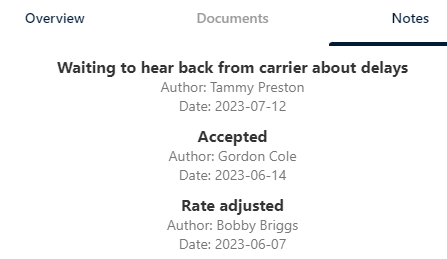
- Lists notes related to the record and allows users to add new notes
- Drafts a reply to the recipient with pre-populated information (such as status and delivery date) from the external system
- Implements the plugin using React, Vite, and TypeScript.
GitHub repo
You can clone the logistics-tms-plugin repo available on GitHub to get quick access to the code for this sample plugin.
Getting started
This section explains how to configure and run the logistics plugin. There's a bit more configuration required than for a typical sample project, so here's a quick overview to get you oriented:
- Install the project—The project is hosted on GitHub so you can clone it and install the project dependencies via NPM.
- Create an app in Front—You'll need to create an app in Front that exposes the project as a plugin. Additionally, you'll set up dynamic objects on the app that identify "record IDs" in Front conversations with the corresponding link for the record in the external system. For purposes of our example plugin, we are matching on the pattern "S" followed by six digits. That is, our example scenario is one where an ID such as S123456 represents the ID of a record in an external system, such as the shipment ID for a transaction in a TMS. The dynamic object in Front adds links to the external system from conversations that contain mentions of IDs such as S123456 or S654321 or the like.
- Configure API services—You'll need to acquire Airtable and Google Maps API keys, plus set up the example records in Airtable to be able to test this plugin as described in the tutorial. Later, you can adapt this configuration to the external system you are actually connecting to for your real-world use case.
This plugin mocks TMS data with Airtable and Google Maps
The plugin uses Airtable and Google Maps to mock a Transportation Management System in a way that is accessible to all developers and customers. When adapting this starter code to a real-world TMS, you will have to change the API / database configuration.
- Run the plugin—Once you've configured an app in Front and configured the project with the example API data, you can run the Vite development server in the project directory and then open your plugin in Front to test out its functionality.
Pre-requisites
You will need Node.js and npm.
Install the project
- Clone the repo from GitHub.
- In your terminal, navigate to the root directory of the cloned repo.
- Run
npm installto install the project dependencies. - Run
npm install @frontapp/front-ui-kitto install the Front UI Kit.
Create an app with a plugin feature and dynamic objects in Front
- In Front, go to Settings > Company > Developers to create an app.
- Name the app "Logistics Plugin," or any name of your choice.
- Add a plugin feature to the app.
- Configure the plugin side panel URL to point to
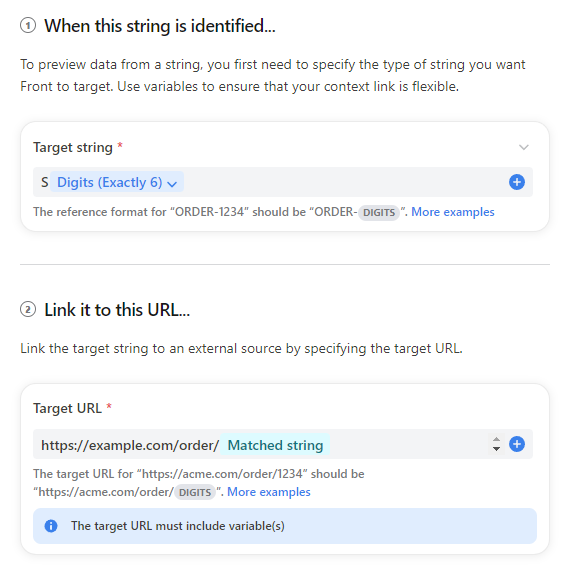
http://127.0.0.1:5173/(this is the default location of the Vite development server, although it may also behttp:localhost:5173). - Add a dynamic object feature to the app. The dynamic object should match on the pattern S[6 digits]. That is, the capital letter S followed by any combination of 6 digits, such as S123456 or S654321. Anytime the pattern is included in a conversation subject, body, or comment, Front will add a dynamic object to the conversation. The logistics plugin will use the dynamic objects attached to the conversation to identify which records to retrieve from the external system.
For the target URL portion of the dynamic object, usehttps://example.com/order/Matched string.
Your dynamic object settings should look like:
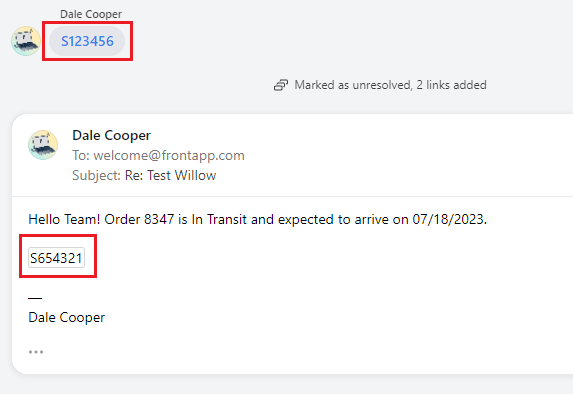
- After creating the app, create a test conversation with the text "S123456" and "S654321" in the subject, body, or as a comment. You should see dynamic objects added to the top of the conversation with the name you gave your dynamic object, and any matching patterns will become clickable in the conversation or comments. Clicking the linked object at the top and then clicking Open... will take you to the target URL for the dynamic object, as will clicking the instance of the matching ID anywhere in the conversation.

Configure API services
For demonstration purposes, this plugin uses Airtable and Google Maps to mock a TMS system and navigational display. To test the functionality of the plugin before adapting it to your specific TMS, complete the following steps to create Airtable records and obtain API keys for Airtable and Google Maps.
-
Create an Airtable account.
-
Create a new base in Airtable.
-
Import the following two tables into your base. One table holds your record data. The other table holds your notes.
-
For the TMS table, clear the Documents column and then add your own attachments (the links from the import won't be accessible).
-
Obtain an Airtable API token. Refer to the Airtable Developers Portal for details.
-
Obtain the Airtable base ID and the two table IDs for the records you created.
-
(Optional) Create a Google Maps Developer account.
If you want to save setup time, comment out the Google Maps iframe in the src/components/TMS file and skip obtaining a Google Maps API key.
-
(Optional) In the Developer Console, create a new project and add an API key with access to the Google Maps API service. Note this API key.
-
In the root directory of the logistics plugin folder you cloned, create a
.envfile.
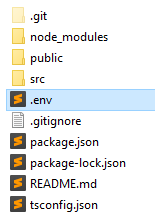
-
Configure the
.envfile as shown:
VITE_API_KEY=YOUR_AIRTABLE_API_KEY_OR_TOKEN
VITE_BASE_ID=YOUR_AIRTABLE_BASE_ID
VITE_TABLE_ID=YOUR_AIRTABLE_TMS_TABLE_ID
VITE_NOTES_ID=YOUR_AIRTABLE_NOTES_TABLE_ID
VITE_MAPS_KEY=YOUR_GOOGLE_MAPS_API_KEY
Run the plugin
- In your terminal, run
npm run devto start the local development server. It should display a message that the server is running at http://127.0.0.1:5173/ (if this value is different for you, make sure to change the plugin side panel URL in the settings for your app).If you get errors related to Front UI Kit, install it explicitly using
npm install @frontapp/ui-kit - In Front, open your "Logistics Plugin" (or whatever name you chose) from the side panel.
The logistics plugin should open and behave as described in the overview video.
How to adapt this plugin for production code
This sample plugin is a great starting point to speed up your development, but you should address the following points to make it ready for a production use case:
-
Retrieve data from your API or database—The sample plugin uses the Airtable and Google Maps APIs for demonstration purposes. Adapt the plugin code to get and post data from the APIs or databases that your TMS or other service uses.
The sample plugin makes API calls in the
src/components/TMSfile within the fetchData, fetchNotes, and onAddNoteClick functions. You will also want to customize the display order arrays to match the data from your system. -
Identify your system IDs—The sample plugin matches records / IDs that fit the pattern "S" followed by six digits. Adapt the plugin code so that it identifies records applicable to your system. Furthermore, the plugin works alongside dynamic objects to identify records. Refer to the record identification section below to learn how this logic works and what you need to do to adapt it to the pattern you want to match on.
The sample plugin identifies records / IDs in thesrc/components/TMSfile. -
Process files from a file server—The sample plugin mocks retrieving an attachment from an external system and attaching it to the draft by using a
sample.txtfile in thesrc/components/documentsdirectory. Adapt the plugin code so that attachments are retrieved and processed from the API or file server that your system uses.The sample plugin retrieves attachments in the
src/components/documents/documentManagerfile. -
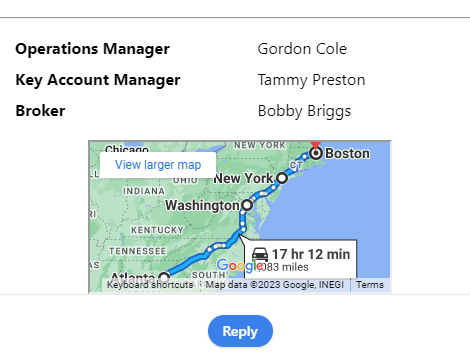
Tailor the visualization data to your use case—The sample plugin uses Google Maps to render an example route for a shipment. Adapt the plugin code so that it renders visualizations that would be useful to your Front users.
The sample plugin renders visualizations in the
src/components/TMSfile. -
Add error handling and tests—The sample plugin does not include error handling or tests. Adapt the plugin code in order to provide stability and security to a production use case.
Noteworthy concepts
The following sections highlight how the sample logistics plugin works.
Loading the Front Plugin SDK context
The plugin loads the Front Plugin SDK in the src/providers/frontContext file and exposes the useContext method so that other components can use it through the React context.
import { useFrontContext } from '../providers/frontContext';
...
const context = useFrontContext();
This allows you to access the Context API methods, such as listMessages, in your component files by using context.listMessages().
The Front context changes depending on whether a user has one conversation, multiple conversations, or no conversations selected in their workspace. Passing the correct context and loading the app is handled by the src/main and src/App files.
In addition, once the Front context is loaded in the src/App file, the plugin demonstrates passing the context as a prop to the TMS component, so you don't have to load the context in each component individually. In this way, you can correctly type the context based on the expected conversation context and with the use of React FC, as shown in the TMS component.
Identifying the records or dynamic objects related to the conversation
The plugin automatically loads data based on the record / dynamic object IDs it identifies in the conversation. For example, the mock data in Airtable contains records with IDs S123456 and S654321. If a conversation in Front contains either of those values in the subject, body, or conversation comments, and if you set up a dynamic object as described in the Getting started section, then Front attaches a link to those records (in our case, mocked to https://example.com/order/<ID>).
When the plugin loads, it searches through the conversation links and keeps track of any links that match the pattern S[Exactly 6 digits]. The matching IDs are used to display data from the TMS record. If a conversation does not contain the IDs S123456 or S654321, then the plugin will only render a search bar. If a conversation contains one or both of those IDs, then it will render data for them.
Clearly, this is a simple example pattern that you will have to adapt for your use case. You will also note that the plugin is partially recreating the pattern-matching logic of the dynamic object when it iterates through the conversation links (although you're saving time not having to search the entire conversation contents for the pattern).
In the future, Front aims to expose more direct information about the dynamic objects attached to a conversation, thereby allowing plugins to directly receive a list of matching IDs or URLs for records that match dynamic object patterns rather than duplicating the pattern-matching logic. For the time being, however, you must use this solution, or better yet, use custom fields. We didn't show the custom fields in this example to minimize the amount of setup required, but using the custom fields approach described below eliminates the need to recreate the pattern-matching logic:
- Create a dynamic object to identify record IDs in conversations.
- Create a rule that populates a custom field with the URL or matching pattern whenever a Link is added to the conversation. You'll need to extract the data as a dynamic variable from the link.
- Identify the custom fields on the conversation via the plugin, and then display information about those records in your plugin.
Understanding the plugin components
The plugin implements the following custom React components to achieve its functionality:
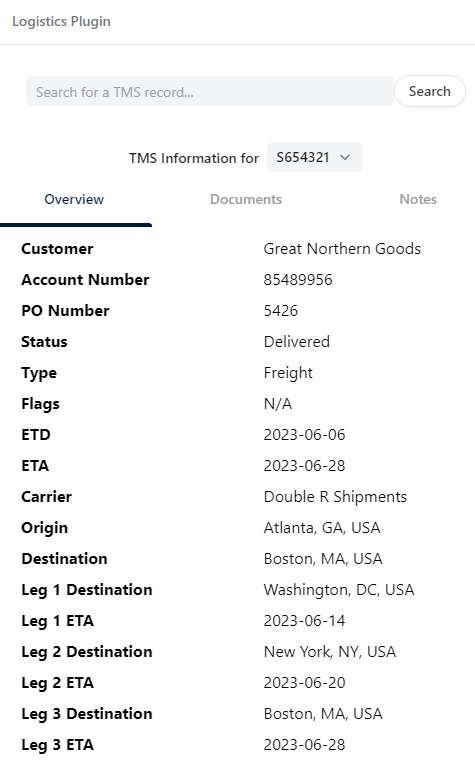
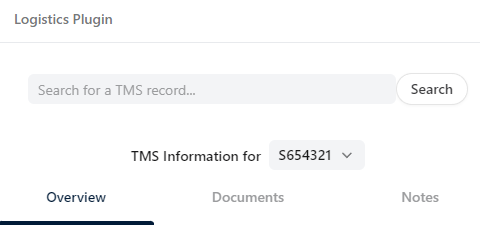
- TMS—This is the parent-level component. It loads a PluginLayout from the Front UI Kit, along with other UI Kit elements such as Tab and Select, to display the TMS information in the Overview tab, along with a Google Maps view, a search bar, Reply buttons, and tabs for attaching documents or adding notes. The component fetches data from the TMS (Airtable in our example) and passes that data to the children components listed below.
- Fetches TMS, note, and navigational data from the external system
- Displays the correct tab depending on user input
- Updates the TMS data based on a user search
- Creates a draft reply based on TMS data and user input
- Allows the user to select between all TMS records related to the conversation, and displays those records in a dropdown
- Allows the user to post new notes to the external system
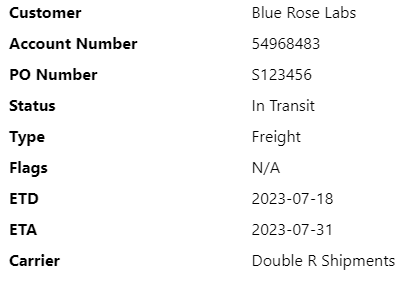
- TwoColumnLayout—This component renders the values of key-value pairs in a given display order as two columns.
- SearchBar—Allows the user to search for a record ID in the external system.

- DocumentManager—Lists documents passed to this component from the external system data. In addition, searches the current conversation for any attachments and lists them to the user alongside the external system documents. Provides buttons so that the user can attach documents to the draft.
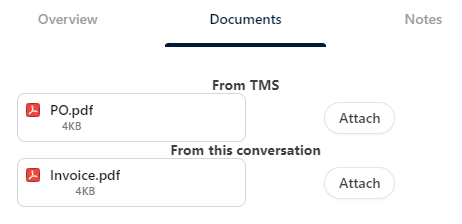
Attachment data is mocked from a local file
The "Attach" button attaches a local file from the project,
sample.txt, to the draft. In a production scenario, adapt this component so that the file is retrieved from your file server. - NotesManager—Displays notes along with author and date/time.
Updated 6 months ago