
Basic dynamic object handler
This sample project demonstrates how you can configure a server to verify that incoming requests are coming from Front, and then pass information from an API response to a dynamic object in Front.
This allows you to augment the information that a dynamic object presents to Front users by adding additional fields other than a title and link to an external record, such as additional IDs, statuses, notes, assignees, and anything else stored in the external system.
Prerequisites
This project uses Vercel to host the application on a public site. This allows the dynamic object in Front to connect to the publicly available server and fetch data from an API. You cannot fetch data for dynamic objects through a local connection, so you will have to use Vercel or an alternative method of deploying your code to the web.
You'll need to create an account on Vercel if you don't already have one (you can create a hobby account for free).
GitHub repo
If you want to view or clone the code directly, visit our GitHub repo.
Get started
Step 1: Create an app in Front
In this step, you create a Front app that will serve as the foundation for your dynamic object handler.
- Create an app in Front through the Developers page in your settings.
- Under the Basic information tab, note the App secret.
Step 2: Deploy the code using Vercel
In this step, you deploy the sample code to the web using Vercel so it's publicly accessible.
Refer to the Vercel documentation for the latest steps
The Vercel deployment process may have changed since the time of this writing. Refer to the Vercel documentation for the latest steps to deploy a project and configure an environment variable.
You can also use the Vercel CLI
If you prefer to use the Vercel CLI, refer to the alternative steps for that process.
-
Create a Vercel account if you haven't already done so.
-
Click the button below to deploy the dynamic object handler code to your Vercel account.
-
Vercel will ask you to connect a Git repo (GitHub, GitLab, BitBucket). After you do so, Vercel deploys the code to your repo and creates a Vercel project. The project will build and deploy itself to a live domain generated by Vercel.
-
After your Vercel project is deployed, go to the project settings and add an environment variable called FRONT_APP_SECRET. Set the value of the variable to the app secret you obtained from Front in Step 1.

-
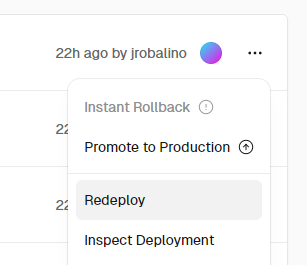
Click your existing deployment in Vercel and redeploy it. This will update the build with the environment variable you added.
-
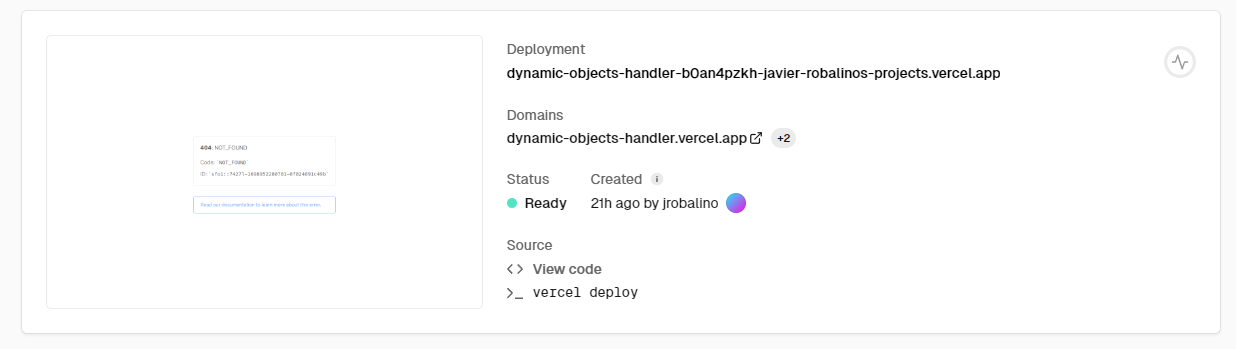
Note your project's domain in Vercel. You will need this to configure a server and dynamic object in your Front app. For example, the domain for our Vercel project was generated as
https://dynamic-objects-handler.vercel.app/
-
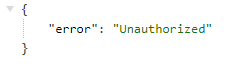
In a browser, visit your Vercel domain with
api/dynamic-objectappended to it. For us, that would look likehttps://dynamic-objects-handler.vercel.app/api/dynamic-object. This is the main route handled by the sample code (which is now deployed live on Vercel). You should see an "Unauthorized" message if your project was deployed successfully. This is because the code checks whether the request is coming from Front, and returns a 401 error if it's not.
Congratulations. You now have the code deployed live and successfully gating any requests that aren't coming from Front.
Step 3: Set up a server for your Front app
In this step, you set up a Front server that routes requests from the Vercel server to your Front app. If you don't complete this step, then your dynamic objects won't be able to communicate with the outside world, in this case, the Vercel server running our sample code.
- Return to the app you created in Front. Click the Servers tab.
- Click Create server and specify the Origin to be your Vercel domain. You can leave the Authentication strategy as "None".
- Click Create.
Step 4: Set up a dynamic object feature for your app
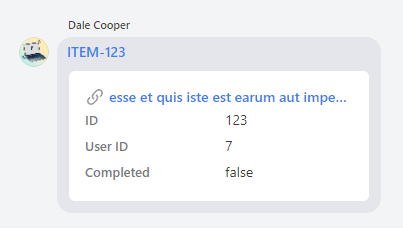
In this step, you set up the dynamic object in Front. The dynamic object will identify "records" in Front conversations or discussions, and send the record IDs to the Vercel server so that it retrieves additional information from the API about that ID. In turn, the dynamic object uses that extra information to add more context to the Front user versus simply providing a link to the external system. For purposes of this tutorial, we are setting the dynamic object to identify records that match the pattern ITEM-123, ITEM-456, etc. and using the JSON Placeholder API to return sample data to us.
- Click the Features tab in your app.
- Click See all dynamic object configurations.
- Click Configure dynamic object.
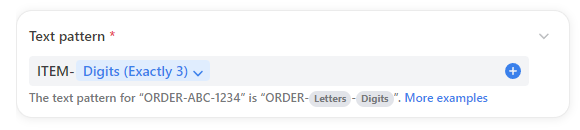
- Specify a text pattern that ends with exactly 3 digits. For example, we used
ITEM-Digits (Exactly 3). You can customize this for your real-word use case, but for the example code to work as written for now, you will need to end your text pattern with a numeric ID that is not longer than 3 digits (this is so that the JSON Placeholder API will return a valid response).
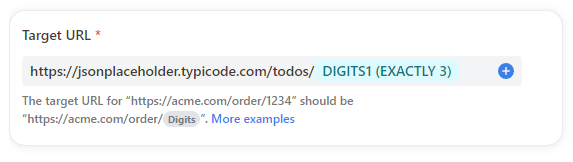
- Specify a target URL set to
https://jsonplaceholder.typicode.com/todos/followed by the "Digits (Exactly 3)" variable. If someone were to type "ITEM-123" in a Front conversation or discussion, then a dynamic object would be created that links to https://jsonplaceholder.typicode.com/todos/123.
- Under Dynamic variables, click Create new, and then Start dynamic variable path.
- Select the Fetch from server option.
- Name the variable "DO Variable", or whatever name you wish.
- For the Fetch from server field, specify your Vercel domain followed by
/api/dynamic-object?id=and then append the "Digits (Exactly 3)" variable. This will send a request to your Vercel server with a query string parameter set to the three digits of the dynamic object text pattern.

- Ensure the dynamic variable ends with a Parse as JSON step.
- Click Save.
Check in on learning
Thus far, you've created a dynamic variable that calls out to the Vercel server with the numeric ID of the matching text pattern from the dynamic object (the "123" in "ITEM-123"). The sample code deployed on Vercel extracts the "123" from the
idquery string in the request, and then makes an API call to the JSON Placeholder API with that ID. The response is returned to the dynamic variable as JSON. - Create another dynamic variable (Under Dynamic variables, click Create new, and then Start dynamic variable path).
- Select the Use result of variable option.
- Name the variable "Title" and set it to use the value of the "DO Variable" you created in the previous step.
- Add a step to Extract object property and set the value of that field to "title".
- Add a step to Parse as String.
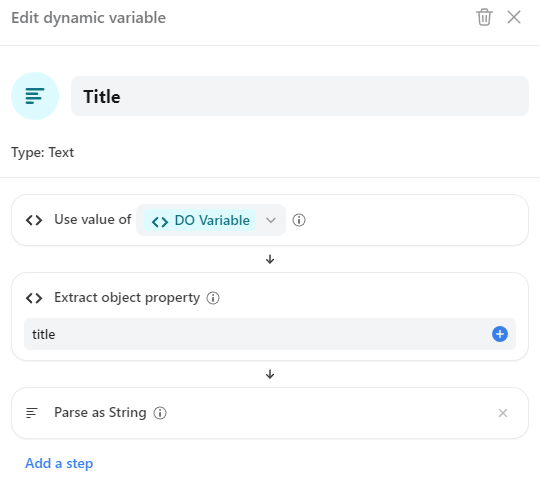
- Click Save.
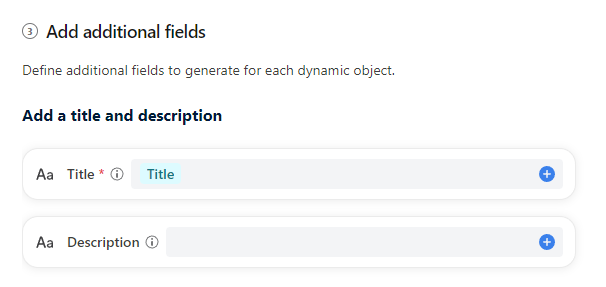
- Under Add additional fields, set the Title field to the "Title" dynamic variable you created. You can repeat this process for any other fields you want to extract from the API response and display in your dynamic object (tip: you'll need to use the add custom fields option to do so).
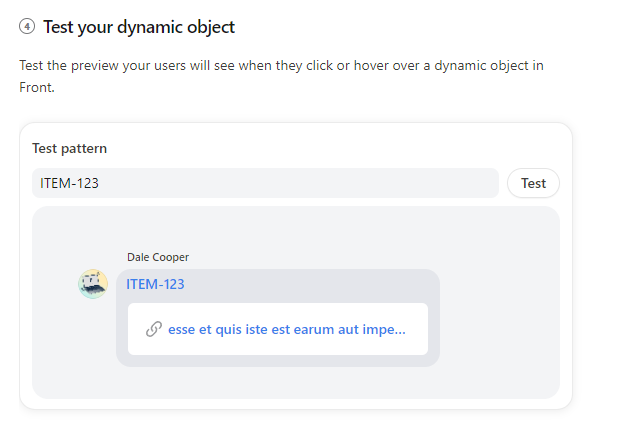
- Under Test your dynamic object, type in "ITEM-123" and hit Test. You should see your dynamic object return the title generated from the JSON Placeholder API for the value 123.
 >
>
Check in on learning
This dynamic variable takes the JSON response saved in the first dynamic variable and extracts specific properties. You can see that https://jsonplaceholder.typicode.com/todos/123 returns four fields:
userId,id,title, andcompleted, so you could extract any of those properties and populate additional information in your dynamic object for the user's benefit.
- Click Create to create the dynamic object.
- After you create your dynamic object, you need to Create a rule in the Dynamic objects configurations page to ensure that your dynamic object runs. The rule specifies what conditions trigger your dynamic object and which inboxes it applies to.
- After clicking Create a rule, enter a name for your rule.
- In the When section, you should see that the rule will run anytime an inbound message is received, an outbound message is sent, an outbound reply is sent, or a new comment is added by any teammate. These default triggers ensure that the dynamic object will scan any new conversations or discussions for the text pattern. You can add additional triggers if you desire.
- The If section of the rule defaults to conversations in any shared or individual inbox. If you want to limit the dynamic object to specific inboxes, change the conditions in this section.
- The Then section specifies which dynamic objects to process when the rule runs. For purposes of this tutorial, select either All applications or the specific app you created for this dynamic object.
That's it! Now any time someone types ITEM-XXX in a Front conversation or discussion, a dynamic object will generate with the help of a Front rule (disabling or deleting this rule will stop the dynamic object from working, so be careful when you manage rules). The dynamic object will pull information through your server from the JSON Placeholder API and surface that information to Front users directly in their workspace.
Customize this code
With the knowledge of how this dynamic object handler works, you can customize the code so that it pulls information from the API or database that you're trying to connect to.
Remember that you will have to update the server and the dynamic variables in your Front app so that they use the values of the API or server you're connecting to.
Happy coding!
Vercel CLI
If you're a more advanced user of Vercel, you can complete the following steps to deploy this project through the terminal instead of the Vercel UI, if you wish. Note that you should still create a Vercel account before starting this process.
- Clone the dynamic-objects-handler repo.
- Change directories into the cloned repo.
- If you haven't installed the Vercel CLI, do so with the command
npm i -g vercelor refer to the Vercel docs for other installation methods. - Run
vercel devto configure the project. Follow the prompts. - Run
vercel env add FRONT_APP_SECRET productionto add your app secret as an environment variable. - Run
vercel deployto deploy your project. - Run
vercel --prodto push your project to production.
You should now have a Vercel project deployed to a public domain (but note that it won't be connected to a Git repo).
Updated about 2 months ago